When we cut out food dyes, I wasn’t sure what the heck I was going to feed the kids. Especially for snack time. My boys are big snackers (as am I!), so it was kind of an important thing to figure out. Obviously, whole foods like fruits, vegetables, eggs, and plain meats (i.e., not spiced/marinated/processed – otherwise not guaranteed to be color free) are going to be dye-free. These foods probably make up the majority of what we eat these days. However, we do eat our share of convenience foods as well.
As much as I love to cook, the reality is I don’t have the time or the energy or the desire to make from-scratch food all the time. I purposely choose not to. I like knowing that I could, so I’ll try various from-scratch recipes from time to time. I think self-sufficiency is important. But I love that we live in an age where I don’t have to make everything if I don’t want to. It’s one less thing to worry about doing every day; convenience foods save sooooo much time. More power to you if you make all your food all the time. I respect and admire that. But I’m guessing that most of you out there are probably eating some amount of convenience foods. Unfortunately for you and me, a lot of those foods are going to have artificial colors and other junk in them.
While this isn’t by any means an exhaustive list of dye-free snack options, it’s a good place to start gathering ideas. If you have any favorites you’d like to share, please leave a comment so we can all benefit from the collective knowledge.
Please note that dye-free is not my only criteria for choosing snacks. I won’t buy items with artificial preservatives (TBHQ/BHT/BHA), artificial sweeteners (aspartame, sucralose), MSG, olestra, nitrates/nitrites, sulfites, or potassium bromate. I try to avoid trans fats too; but it gets tricky because companies can legally label something “0 grams of trans fats” when, in fact, it only contains less than 0.5 grams. That means it could have up to 0.49 grams of trans fats per serving, and that can quickly add up to surpass the suggested daily limit of 1-2 grams. A general rule of thumb for avoiding trans fats is to steer clear of partially hydrogenated oils. If you’re interested in why I won’t buy these things, I’ll link to some helpful articles at the bottom of this page.
FYI, this list is just based off what’s in my kitchen right now and what I can remember buying other times. I’ll update it if I remember more or find new favorites.
Crackers and Granola Bars
Kashi Granola Bars
Nature Valley Granola Bars (Oats ‘N Dark Chocolate, Peanut Butter, and Greek Yogurt Protein; haven’t checked other flavors)
Millville (Aldi’s) Protein Chewy Bar (Dark Chocolate Peanut Butter; haven’t checked other flavors)
Buttery Round Crackers (Ritz brand and Savoritz brand [Aldi’s])
Stauffer’s ORIGINAL Animal Crackers (not the ones with frosting)
Honeymaid Angry Birds Graham Crackers (My boys are OBSESSED with Angry Birds, so these are fantastic!)
Teddy Grahams crackers (Honey and Chocolate Chip are safe; haven’t checked other flavors.)
Annie’s Bunny Grahams (any flavor is safe)
Annie’s Whole Wheat Bunny Crackers (all other flavors have annatto)
Parmesan Goldfish Crackers (all other flavors have annatto; parmesan is the green bag)
Market Pantry (Target) Peanut Butter Sandwich Crackers
———-
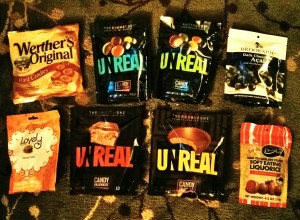
Candy
UNREAL candies (“unjunked” versions of M&M’s, Peanut M&M’s, Milky Ways, and Peanut Butter Cups)
True North Almond Pecan Cashew Clusters
Mott’s Medleys fruit snacks
Simply Nature (Aldi’s) fruit snacks
Fit & Active (Aldi’s) All Natural Fruit Strips
Simply Balanced (Target) Fruit Strips
YummyEarth Organic Lollipops
Chocolate chips (Plain chocolate chips and white chocolate chips have been safe in every brand I’ve checked; however, peanut butter and butterscotch usually have caramel coloring.)
Black Forest Gummy Worms (Hy-Vee carries them)
Caramels (Lovely Candy Co. brand, and Werther’s Originals)
Darrell Lea Liquorice (Target carries it)
Chocolate Bars and Candies (If it is just chocolate [no fillings, flavors, coating] it’s probably fine. We like organic dark chocolate bars in our house. So good! Dove originals, Brookside chocolates, and Hershey’s originals are all good.)
———-
Cookies
Vanilla wafers (Aldi’s Benton’s brand, and Nilla brand)
Oreos (the seasonal ones with colored frosting are not ok)
Pillsbury Simply refrigerated cookie dough – all flavors
Keebler Simply Made Cookies – all flavors
———-
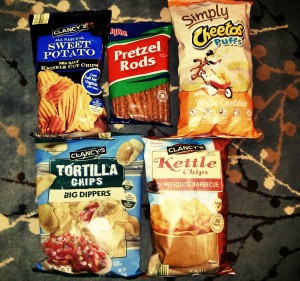
Chips
Clancey’s (Aldi’s) Sweet Potato Chips (These are my favorite snack. I’m eating them right now. They’re incredible! Plus 14 chips count as a serving of vegetables…I doubt it’s the best kind of vegetable serving a person could have, but it justifies my addiction.) 🙂
Corn Tortilla Chips (All the brands I’ve seen have been safe, but watch for trans fats.)
Clancy’s (Aldi’s) Kettle Chips Mesquite Barbecue flavor
Cheetos Simply White Cheddar
Ruffles Simply Sea Salted Potato Chips
———-
Cereals – We lean towards eating cereals with lots of protein and good nutrition to actually fill you up. All of these are less than $3/box; nothing crazy expensive here. 🙂
Cheerios (original and honey nut are safe, others have colors)
Kashi (anything I’ve ever seen by their brand is safe and super healthy)
Post Grape Nuts
Cascadian Farm Oats and Honey Granola
Archer Farms French Vanilla Almond Crunch Granola
Nature’s Path Coconut Chia Granola
Simply Nature (Aldi’s) Fruit Muesli, and Toasted Oats
Nature’s Best Blue Pom Wheatfuls
**BEWARE of TBHQ and BHT as preservatives in cereals. It’s very common. Also extremely annoying because even within a brand some cereals will have it and some won’t. Always check!**
———-
Frozen Desserts
Blue Bunny All Natural Vanilla ice cream
Breyer’s All Natural (Chocolate, Vanilla, and Strawberry flavors)
Belmont’s (Aldi’s) – any flavor
Simply Nature (Aldi’s) Popsicles
———-

Other
Nuts – any plain or salted nuts should be fine
Dried fruits (Generally safe, but keep an eye on the preservatives used.)
Hy-Vee brand Unsweetened Applesauce
Hy-Vee brand Marshmallows (Not sure about other generic brands, but the name brand Jet Puffed marshmallows have blue dye in them.)
Mozzarella Cheese Sticks (Hy-Vee brand, Kraft, and Happy Farms [Aldi’s] have all been fine)
Wholly Guacamole (We usually make our own guac, but this is nice when you don’t have time or if avocados are out of season/expensive.)
Salsa – most kinds are safe (This is my husband’s favorite snack. Give him some chips and some Mad Butcher’s Salsa, and he is a happy man.)
Pretzels (Most plain, bagged pretzels should be safe.)
Popping Corn (not the bagged stuff, just the seeds that you pop on your stovetop at home)
Joy brand Waffle Bowls (fun for special desserts)
Yogurt (We make our own Greek Yogurt, but most brands will have some dye-free options. I know Chobani, Dannon, and Yoplait do. Yogurts branded towards kids probably will have artificial colors though.)
———-
Links to information on other bad food additives:
Center for Science in the Public Interest (CSPI) has a very helpful list describing all food additives.
Australia’s Northern Allergy Center also has a full list of food additives and any harmful effects.
A BusinessWeek article from 1996 shows that the dangers of food additives have been known or questioned for quite some time.
Hungry For Change has a succinct list of their top 10 food additives to avoid.