Fabulously Fast French Toast Casserole

Ahhh, cinnamon.  We all know it smells amazing.  But did you know it’s really good for your brain too? Just a whiff has been shown to boost your memory, attention span, and visual-motor speed.  I don’t know about you, but after a long day with the kids I could sure use some help in those departments.  Truthfully, with an infant in the house, some days I need help all day.  We’ll sprinkle it in our coffee grounds or on our oatmeal in the morning to help us wake up.

And that’s just the smell.  Now if you actually eat cinnamon you get even more health benefits.  It has amazing anti-viral and anti-microbial properties (traditional Chinese medicine has long claimed ingesting cinnamon is one of the best ways to ward off a cold).  It also helps control your blood sugar levels by making the stomach empty more slowly after meals. That means your blood sugar won’t spike so dramatically; in fact, some studies have shown it to be more effective than certain diabetic medications.

Pretty neat stuff, that cinnamon.  Hey, want a quick little recipe you can just pack full of as much cinnamon as you can stand?  I got one.  We’ve been eating it weekly around here this winter.  It’s easy to throw together for dinner, and it’s fantastic for feeding a crowd at breakfast when you have house guests.  (P.S. Kids devour it!)

Alright, let’s get cookin’ on this delicious, dye-free, cinnamon-filled French toast casserole.

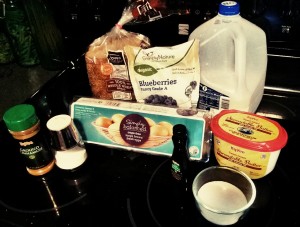
Preheat your oven to 375, grab a 9″x13″ baking dish, and gather your ingredients: bread, milk, eggs, butter, berries, vanilla, salt, sugar, and cinnamon.

ingredients

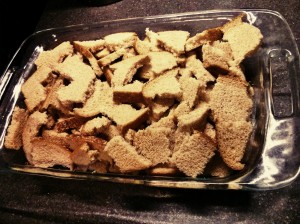
You’ll need somewhere between a third to half a loaf of bread.  Any bread will do.  French toast was originally developed for using up stale bread, which you can usually get super cheap at grocery stores and bakeries. (Midwest friends, Jimmy John’s day old bread is only 50 cents a loaf! Yum!)  I usually use whole wheat sandwich bread, because it’s what we have on hand.

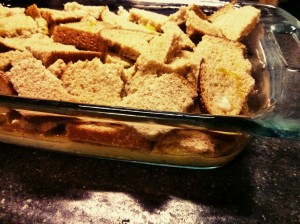
Tear up your bread into roughly square inch large pieces.  Put the bread into your greased baking dish.  You want it to be full to the brim, but not much higher than that since it will puff up a bit while baking.

bread

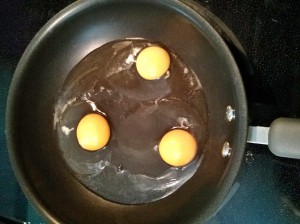
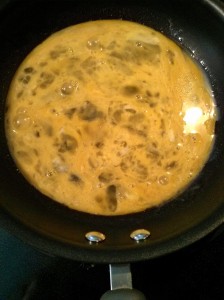
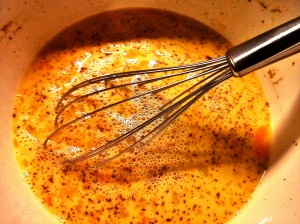
Next, whisk 6 eggs with 2 cups of milk until well blended.  Stir in a 1/3 cup of sugar, 1 teaspoon of cinnamon (you can adjust this amount depending on how strong a taste you want), 1 teaspoon of vanilla, and 1/2 teaspoon of salt.

whisk

Pour your egg mixture over the bread.

pour

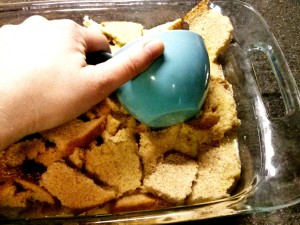
Now press the bread into the egg mixture (I use the side of a measuring cup or a spoon so my hands don’t get dirty).  You just want all the bread to be wet.

press

Let the bread soak in it’s little egg bath for at least 10 minutes.  While you’re waiting you can put on the topping.

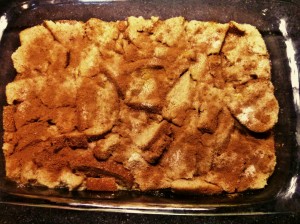
Sprinkle a couple tablespoons of sugar and about two teaspoons of cinnamon evenly over the top of the casserole.

topping1

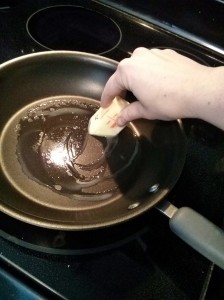
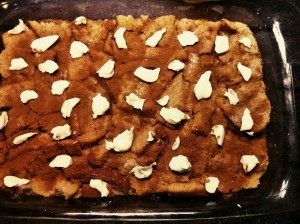
Then dot the whole thing with little pieces of butter.  If you use a spreadable butter for this (versus a stick of butter) it’s much easier.

topping2

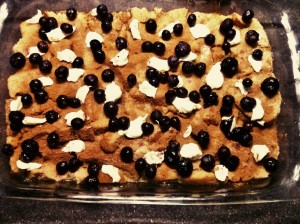
Finally, shower on some berries.  Fresh or frozen.  Any kind you like.  They all work.  Or you can omit the berries.  Or use nuts instead.  Or use both berries and nuts.  Get crazy!

topping3

You can do all this the night before if you’re making it for breakfast.  Just make sure you let the dish sit out on the counter for at least half an hour, so it can warm up a bit before you throw it in the hot oven to bake.  Otherwise it may crack.

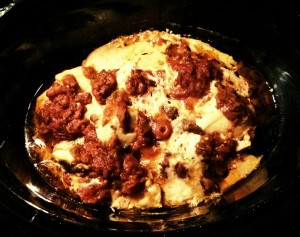
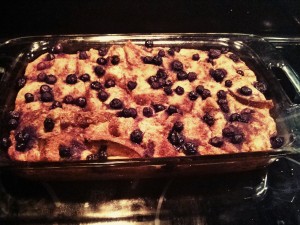
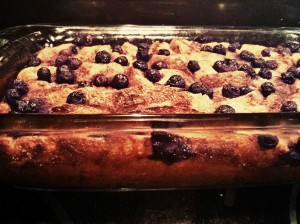
Once your oven is hot and your casserole has had adequate soaking time, pop it in the oven.  Let it cook for about 40 minutes.  It should puff up a couple inches above the brim of the dish, and the sides will be a nice golden brown when it’s done.

french toast casserole

golden edges

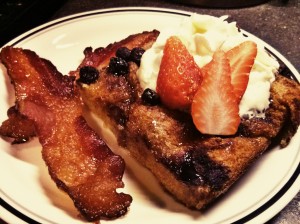
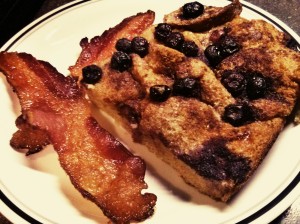
Serve it while it’s nice and hot.

french toast casserole 2

This dish smells SO good!  I’m salivating just thinking about it.  Plus, your house will smell wonderful and everyone in it will get a little brain boost to defeat that late afternoon drag.  Win-win-win.

A couple tips and tricks for my fellow busy mamas:

I try to get the egg mixture made and the bread torn up during nap time.  Just keep the egg part in the fridge until you’re ready to assemble the rest.  Saves some time.  You can even go ahead and make the whole thing during nap time and put it in the fridge until later.  As I said before, just remember to let your dish warm back up a little before you put it in the oven.

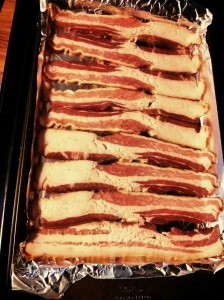
My favorite side for this dish (okay, for anything) is bacon.  What’s handy is I realized that if you bake your bacon on a foil lined baking sheet at 375, it is done in roughly the same amount of time as this casserole.  It was meant to be.  To cut out the nitrates in bacon, get an uncured kind.  I buy Farmland All Natural Uncured Bacon (Hy-Vee) and Simply Nature Applewood Smoked Uncured Bacon (Aldi’s).  Both are great….but is there really such a thing as bad bacon?

bacon

If you’re feeling especially nice and/or fancy, adding a little whipped cream is always a crowd pleaser around here.  I’d say I was doing it for the kids, but I’d be lying.  I’m pretty sure we want it more than they do!  🙂

french toast casserole whipped cream

Bobby Flay Would Never Hire Me: How to Cook an Omelet

Think your eggs are adequate?  Bobby Flay would probably tell you to think again.  In fact, he’s said that he won’t hire anyone at his restaurants who can’t make a good omelet.  That’s how basic and essential a cooking skill he thinks it is.  I felt so ignorant.  Here I was thinking I was a decent cook.  I had no idea just how poorly I was making my breakfast until I saw him make an omelet.  Holy cow!  Talk about a game changer!

This life lesson came about one afternoon when all three of my boys were miraculously napping at the same time.  I put on a random episode of Bobby Flay’s Throwdown (I love cooking shows!) while I sat down to eat some lunch.  Initially, when I saw it was about omelets, I thought it was going to be lame.  But then I saw him make an omelet. That’s not how I made my omelets…  His looked incredible.  It couldn’t be that easy.  Since I had some free time, I gave it a shot.  AMAZING RESULTS!  I was hooked.

So I just had to share it with you.  In case you too are longing for a better breakfast.  A special thanks to Bobby Flay (who will likely NEVER see this) for the life changing lesson in cooking!

Let’s get to it.  Turn your burner on to medium-low heat.  Grab a pan and grease it.  I use butter because, yum, it’s butter.

butter

Crack open some eggs.  Lately I’ve been doing three, but I’m nursing a baby so I’m extra HUNGRY.  🙂

crack eggs

Whisk up those eggs so the yolks and whites are fairly well blended.  (You can also do this in a bowl and then pour it in the pan if you want an even fluffier omelet, but I don’t like making extra dishes.  I don’t even use a whisk, that’s how much I hate getting extra things dirty.)

whisk

Let it set a bit until the very bottom starts turning white.  While you’re waiting, it’s a good time to sprinkle on some salt and pepper if you’re into seasoning.

wait

Don’t let it get too firm.  The next step is to scrape the cooked eggs and mix them around with the uncooked parts.  Almost the way you would if you were going for scrambled eggs.  What you’re wanting to do is push up the firmer parts and redistribute the uncooked parts onto the bare pan to cook.

scramble

Let the eggs cook until they aren’t very jiggly anymore (yep, super technical terminology here).  Then slip your spatula around the edges to loosen it.

cook

Now flip it.  Bobby likes to do a fancy throw in the air to flip his omelets, but for the rest of us a regular old spatula flip will do the trick.

flip

Let it cook another minute or two until the eggs are cooked through.  You can lift and check the underside if you aren’t sure on the timing.  While you’re letting it cook, throw on your fillings.  I used bell peppers, mushrooms, and mozzarella in this guy.

filling

When the eggs are cooked and your cheese is melted, gently fold it in half.

fold

Slide your omelet onto a plate.

plate it

Now dig in!  Cut up some fruit, grab a handful of nuts, steal some of your kids’ Bunny Grahams, and you’ve got yourself a beautiful meal.  And a tasty, healthy, filling one at that!  🙂

breakfast

If your eggs already looked like this, you’re awesome (and light years ahead of me in life skills).  But if your eggs look less appealing than this, I challenge you to try it the Bobby Flay way.  I promise you won’t regret it.

Here’s the episode I watched via Amazon Instant Video: Bobby Flay Throwdown: Omelets.

If you want to see the master at work, here’s a YouTube video of Bobby making an omelet.  He does it a little differently and at a higher heat than he did in the throwdown, but both ways work.

Go make yourself some eggs!

Feeding the Kids: Easy Dye-Free Lunches

Other stay at home mamas will feel me on this one.  It’s 11:45 AM, you’re going about your morning doing all your usual mama stuff (folding laundry, wiping butts, splitting up fights, picking up toys, making appointments, feeding the baby, washing dishes, answering your 100th “why” question of the day, possibly even getting ready yourself).  Suddenly you’re bombarded with urgent cries of I’m hungry! When are we going to eat??

Yep, it’s lunch time.  How does it always sneak up on me like that?  I never have anything planned.  Shoot….  BUT, the beauty of going through all the work of creating a dye-free kitchen, is that anything I dig out and throw on a plate for the kids is going to be safe for them to eat.  Saves a lot of time and worry if you don’t want your kids to have food dyes.

If you’re new to dye-free living, hopefully this will give you some ideas.  You might notice that some of the things we eat for lunch overlap with my list of dye-free snack foods.  That’s because I’m literally just grabbing whatever we have on hand and putting it on a plate.  We have lots of snacky foods on hand.  🙂

Here’s a sample of what my kids have been eating the last couple weeks.

lunch

Turkey (Simply Nature uncured turkey from Aldi’s) and provolone with mayo, carrots and strawberries, Annie’s Chocolate Bunny Grahams, and almonds.

lunch

Turkey and salami (Hormel’s uncured hard salami), carrots, cherry tomatoes, a strawberry, ranch dressing (Marzetti organic ranch veggie dip from Hy-Vee – no MSG like most ranch), mixed nuts, and Simply Cheetos white cheddar puffs.  We also had some Greek yogurt on the side.  If you manage to arrange their food into a weird face or picture, even better.  My older boys are 5 and 3, and they think this is hilarious.  So if you want to impress your young ones…. 🙂

lunch

Hebrew National hot dog with ketchup (we use the Hunt’s brand without high fructose corn syrup), cherry tomatoes, a clementine, some pecans, and a handful of Parmesan Goldfish.  Again, we had Greek yogurt on the side as well.  (We go through a lot of yogurt!)

lunch

Turkey, Ritz crackers, almonds, carrots, blueberries, and some cottage cheese.

lunch

Peanut butter and jelly, salami (because they LOVE it and always ask for “just one piece!”), a clementine, cherry tomatoes, blueberries, and some Stauffer’s animal crackers.

lunch

Alright this lunch was from the weekend, which is why it’s a little (but not much) more time intensive than our other lunches.  🙂  Van de Kamp’s fish sticks, cantaloupe, mixed nuts, and a Nature Valley Oats N’ Dark Chocolate granola bar.

lunch

Peanut butter and jelly sandwich (yes, again…it’s easy!), a mozzarella cheese stick, a clementine, and a bunch of mixed nuts.

By now you’re probably getting the general pattern of what I throw on a plate for the boys.  Nuts, fruit/vegetables, a sandwich or some meat, usually something from the dairy group as well for protein.  They may not be fully balanced meals, but I think overall they’re healthy.  My kids also have a mid-morning snack with fruits and nuts and proteins, so their lunches aren’t usually huge.

lunch

This was our Valentine’s Day lunch.  A heart shaped Nutella and raspberry jelly sandwich, heart shaped bananas, strawberries, mozzarella cheese stick, almonds, a Fit & Active fruit strip (from Aldi’s), and some Brookside dark chocolate candies.

I don’t have a picture of it, but my kids really like having scrambled eggs for lunch.  It doesn’t take too long to cook some up.  So if you’ve had PB&J a few days in a row, you can always give eggs a try.  🙂

I know it’s nothing revolutionary, but I see that as a good thing.  Just more proof that going dye-free doesn’t have to be complicated.  Anyone can do it.

Dye-Free Discovery: Thai Soup

I just had to share this.  It was too good not to share.  I’m talking about Swanson 100% Natural Thai Ginger Broth.

I happened across this new dye-free convenience food while grabbing some beef stock for my French Dips the other day.  My husband lived in Thailand for a while, and is obsessed with the food.  So I had to give it a try.

I promise this is not an ad.  I am in no way affiliated with Swanson’s or Campbell’s.  🙂  I just genuinely LOVED this soup.  And it really is all-natural as advertised.  Check out the ingredients list for yourself.

ingredients

My husband, being the Thai food connoisseur of our household, was a bit skeptical that it would taste authentic.  We tried it tonight.  He gave it a big thumbs up.

Even the kids liked it, though they complained that it “hurt their tongues” a little at first.  It was spicier than most other foods I make, but I wouldn’t categorize it as spicy.  Had just the right amount of heat to it.  They still ate it, and even said they liked it afterwards.  So good job, Campbell’s.

It was also really easy to prepare.  I happened to have all the ingredients on-hand, so that worked out nicely.  Plus it was an excellent way to use my leftover shredded chicken.

ingredients

Took about 20 minutes altogether to prepare.

Sorry for the slightly blurry picture. Oops...

Sorry for the slightly blurry picture. Oops…

Here it is in all it’s delicious goodness.  Mmmmmm…I can still smell it.

thai soup

If you’re not in the mood for soup, you can use this broth to make other recipes too.  The Campbell’s Swanson website has more recipes.  Apparently, they also make two other flavors: Mexican Tortilla, and Chinese Hot and Sour.  Looking forward to trying those.

If you like Thai food, give this one a try.  It made a great dye-free dinner for us.  🙂

5 Minute Shredded Beef

What could be better than The Easiest Chicken You’ll Ever Make?  The easiest beef.  Because in my world, beef trumps chicken every time.  A savory French dip is one of my favorite meals.  If I only have to dedicate 5 minutes of effort into making one, all the better.  🙂

Now, don’t feel like you have to make French dips with this beef.  Even if you do, there’s usually plenty left over to use in other dishes later in the week.  The meat is just lightly seasoned (you can also not season it at all and have it turn out just fine), so it’s very versatile.  It’s great in beef stroganoff, enchiladas, stirfry, and more.  Almost any dish calling for ground beef can use this meat instead.  Cutting out the time of browning ground beef makes preparing meals that much less troublesome.

First, grab your ingredients: 3 lbs of bottom round roast, beef stock, and seasoning if you’re using it.  I use onion powder, garlic powder, Tony Chachere’s Creole Seasoning, and Lowrey’s Seasoning Salt.  **Watch out for artificial colors and MSG in the stock and any seasonings you choose.  Pretty common to see those in these items.

ingredients

Cut the meat in half and place it in your slow cooker.  I like to put a little of the stock in the bottom of the pot before I put the meat down, just to ensure nothing sticks.  Makes cleanup much easier.

cut meat

Cover the meat at least half way up with beef stock.  If you want to save money (I do!) then just use water for the rest.  Whatever you decide to use, fill the pot until the beef is mostly covered.

add stock

Sprinkle on your seasonings.  I use about a teaspoon of each of mine.  Give your stock a little stir if you’d like, but I usually don’t and it all blends together just fine.

season

Put the cover on, set your cooker for at least 6 hours (medium-high heat), and walk away.  You can make it in 4 hours, but it’s not quite as tender or flavorful as I prefer.

After the allotted cooking time, grab a couple forks and pick up one half of the meat.

half

This cut of meat usually as a “fatty side”, but it scrapes off easily.

scrape fat

Once you remove the fat, start shredding.  I recommend shredding all of it right away while it’s warm, because it just falls apart.  Takes literally two minutes to shred all three pounds.  It’s slower going once it’s been refrigerated.

shred

That’s it, folks!  Five minutes of work and you’ve got a big ol’ pile of beef to do with as you please.

shredded beef

If you’d like to see how I make my French dips, keep reading.  If not, enjoy your beef!  🙂

To make the French dips, all you need are some hoagies and cheese.  I usually add some sweet bell peppers too.

Preheat the broiler in your oven.

Last year while learning to make different kinds of bread, I found this great recipe for homemade hoagies over at Amy’s Cooking Adventures.  I’ve been making them ever since.  They are so simple!  And they freeze well (that’s the definition of a real winning recipe in my book). It takes less than a minute to heat them back up in the microwave.  Love that fresh bread smell!  Perfection! Store bought hoagies are awesome too.  I’ll buy a bag if we’re having a lot of people over and I don’t have enough hoagies left in the freezer.  Whichever you’re using, cut them length-wise and lay them open on a baking sheet.

hoagie

Put your meat on one side of the roll and your cheese and veggies on the other side.  You can also butter the inside of your bread first if you want some extra flavor.  Now pop that tray in the oven on one of the lower racks so the bread doesn’t burn.  Keep an eye on it.  It only takes a couple minutes to cook.

assemble french dips

When the cheese has melted and the bread starts browning around the edges it’s done.

finished french dips

You can ladle some of the stock straight out of the Crock Pot to use as au jus.  Most store bought au jus mixes have caramel coloring in them.  This is a simple dye-free alternative.

If you want a thicker, more gravy-like version you can make a quick roux (equal parts butter and flour whisked together in a small pot – 2 Tbs of each will turn into a good amount of gravy).  Then add in the stock from the slow cooker until it’s the consistency you’re going for (if you use 2 Tbs in the roux, then it’ll take about 2 cups of stock to make a good gravy).  Just giving you another option if you’ve got a some extra time and feel like being fancy.  🙂

Add a few sides and you’ve got a super fast, delicious French Dip dinner.

french dip dinner

Enjoy!

The Easiest Chicken You’ll Ever Make

Seriously, I can’t imagine cooking chicken being any easier than this.  I feel like it hardly qualifies to be called a recipe; it’s only two ingredients. The best part is you can use the meat in lots of different meals.  And, of course, it’s dye free.

Let’s get to it.  Gather your ingredients: a bag of frozen chicken and some salsa.  We usually do three pounds of chicken and use a 16 oz jar of salsa (all the salsas I’ve seen are dye free, but always double check).  I’ve also done only two chicken breasts with a 1/3 cup of salsa in a tiny crock pot and it works just fine.  Tailor it to your needs.  I, personally, love having leftover meat to quickly throw into a dish later in the week, so I make a lot at once.

ingredients

Get out your crock pot.  Pour in the frozen chicken.

frozen chicken

Now cover the chicken with the salsa.

addsalsa

Put the lid back on and set your slow cooker for however long you want.  I’ve done it on high for 4-6 hours and on low for 8-10.  Everything turns out the same.  Time it so it will be done cooking a little before you want to eat.  I threw this together at 9:00 AM, so I did 8 hours since we usually eat around 5:30 PM.  But I’ve also started it at 1:00 PM and cooked it on high for 4 hours and it was perfectly done in time for dinner.  Don’t be afraid to try it at the faster cooking time.

I won’t lie to you.  This doesn’t look extremely appetizing while it’s cooking.  After a couple hours it’ll look like this.

cooking

It does smell pretty good though.  So trust that and just try not to look at it until it’s done.  🙂

When your chicken is done cooking, it’ll look like this.  Still looks a little weird, but hang in there things are about to get pretty.

donechicken

Now get out a bowl and a couple forks.  You’re going to shred your meat directly into the serving bowl, because why make extra dishes?

serving bowl

Use the forks to carefully transfer a couple chicken breasts to the serving dish.  I usually scrape the chunks of salsa off ours a little while it’s still in the slow cooker, but you don’t have to.

movechicken

Now use your forks to pull the meat apart.  When the chicken is warm it shreds easily.  I shred all of mine and then store any leftovers in the fridge for later.  It’s not as fast to shred it once it’s been refrigerated.

shredded

That’s it!  Use your shredded chicken however you’d like.  The first night I usually make chicken tacos – set out some fixin’s and tortillas and you’re good to go.  I like making pasta dishes or sandwiches with what’s leftover later in the week.

The meat has a really nice flavor, but you can also spice it to your taste as it’s cooking.  For example, if you want to make ALL of it into taco meat, you could add a package of taco seasoning (a safe, dye-free option is McCormick) along with the salsa and then cook it.  If you make three pounds of chicken taco meat, you can easily feed a large group.  It’s great for a quick dinner when you’re having company, but have tons of other things to do (like clean your house, take care of the kids, etc).

Here’s a glimpse at the delicious chicken tacos we had for dinner last night.  Taco nights are the best, because the kids eat so fast.  No complaining, no stalling; just the beautiful sounds of chewing.  I hope you enjoy it as much as we do!

chicken tacos

Kid Approved Dye-Free Snacks

When we cut out food dyes, I wasn’t sure what the heck I was going to feed the kids.  Especially for snack time.  My boys are big snackers (as am I!), so it was kind of an important thing to figure out.  Obviously, whole foods like fruits, vegetables, eggs, and plain meats (i.e., not spiced/marinated/processed – otherwise not guaranteed to be color free) are going to be dye-free.  These foods probably make up the majority of what we eat these days. However, we do eat our share of convenience foods as well.

As much as I love to cook, the reality is I don’t have the time or the energy or the desire to make from-scratch food all the time.  I purposely choose not to.  I like knowing that I could, so I’ll try various from-scratch recipes from time to time.  I think self-sufficiency is important.  But I love that we live in an age where I don’t have to make everything if I don’t want to.  It’s one less thing to worry about doing every day; convenience foods save sooooo much time.  More power to you if you make all your food all the time.  I respect and admire that.  But I’m guessing that most of you out there are probably eating some amount of convenience foods. Unfortunately for you and me, a lot of those foods are going to have artificial colors and other junk in them.

While this isn’t by any means an exhaustive list of dye-free snack options, it’s a good place to start gathering ideas. If you have any favorites you’d like to share, please leave a comment so we can all benefit from the collective knowledge.

Please note that dye-free is not my only criteria for choosing snacks.  I won’t buy items with artificial preservatives (TBHQ/BHT/BHA), artificial sweeteners (aspartame, sucralose), MSG, olestra, nitrates/nitrites, sulfites, or potassium bromate.  I try to avoid trans fats too; but it gets tricky because companies can legally label something “0 grams of trans fats” when, in fact, it only contains less than 0.5 grams.  That means it could have up to 0.49 grams of trans fats per serving, and that can quickly add up to surpass the suggested daily limit of 1-2 grams.  A general rule of thumb for avoiding trans fats is to steer clear of partially hydrogenated oils.  If you’re interested in why I won’t buy these things, I’ll link to some helpful articles at the bottom of this page.

FYI, this list is just based off what’s in my kitchen right now and what I can remember buying other times.  I’ll update it if I remember more or find new favorites.

Crackers and Granola Bars

Kashi Granola Bars

Nature Valley Granola Bars (Oats ‘N Dark Chocolate, Peanut Butter, and Greek Yogurt Protein; haven’t checked other flavors)

Millville (Aldi’s)  Protein Chewy Bar (Dark Chocolate Peanut Butter; haven’t checked other flavors)

Buttery Round Crackers (Ritz brand and Savoritz brand [Aldi’s])

Stauffer’s ORIGINAL Animal Crackers (not the ones with frosting)

Honeymaid Angry Birds Graham Crackers (My boys are OBSESSED with Angry Birds, so these are fantastic!)

Teddy Grahams crackers (Honey and Chocolate Chip are safe; haven’t checked other flavors.)

Annie’s Bunny Grahams (any flavor is safe)

Annie’s Whole Wheat Bunny Crackers (all other flavors have annatto)

Parmesan Goldfish Crackers (all other flavors have annatto; parmesan is the green bag)

Market Pantry (Target) Peanut Butter Sandwich Crackers

———-

candy

Candy

UNREAL candies (“unjunked” versions of M&M’s, Peanut M&M’s, Milky Ways, and Peanut Butter Cups)

True North Almond Pecan Cashew Clusters

Mott’s Medleys fruit snacks

Simply Nature (Aldi’s) fruit snacks

Fit & Active (Aldi’s) All Natural Fruit Strips

Simply Balanced (Target) Fruit Strips

YummyEarth Organic Lollipops

Chocolate chips (Plain chocolate chips and white chocolate chips have been safe in every brand I’ve checked; however, peanut butter and butterscotch usually have caramel coloring.)

Black Forest Gummy Worms (Hy-Vee carries them)

Caramels (Lovely Candy Co. brand, and Werther’s Originals)

Darrell Lea Liquorice (Target carries it)

Chocolate Bars and Candies (If it is just chocolate [no fillings, flavors, coating] it’s probably fine. We like organic dark chocolate bars in our house. So good! Dove originals, Brookside chocolates, and Hershey’s originals are all good.)

———-

Cookies

Vanilla wafers (Aldi’s Benton’s brand, and Nilla brand)

Oreos (the seasonal ones with colored frosting are not ok)

Pillsbury Simply refrigerated cookie dough – all flavors

Keebler Simply Made Cookies – all flavors

———-

chips

Chips

Clancey’s (Aldi’s) Sweet Potato Chips  (These are my favorite snack.  I’m eating them right nowThey’re incredible! Plus 14 chips count as a serving of vegetables…I doubt it’s the best kind of vegetable serving a person could have, but it justifies my addiction.)  🙂

Corn Tortilla Chips (All the brands I’ve seen have been safe, but watch for trans fats.)

Clancy’s (Aldi’s) Kettle Chips Mesquite Barbecue flavor

Cheetos Simply White Cheddar

Ruffles Simply Sea Salted Potato Chips

———-

Cereals – We lean towards eating cereals with lots of protein and good nutrition to actually fill you up.  All of these are less than $3/box; nothing crazy expensive here.  🙂

Cheerios (original and honey nut are safe, others have colors)

Kashi (anything I’ve ever seen by their brand is safe and super healthy)

Post Grape Nuts

Cascadian Farm Oats and Honey Granola

Archer Farms French Vanilla Almond Crunch Granola

Nature’s Path Coconut Chia Granola

Simply Nature (Aldi’s) Fruit Muesli, and Toasted Oats

Nature’s Best Blue Pom Wheatfuls

**BEWARE of TBHQ and BHT as preservatives in cereals.  It’s very common.  Also extremely annoying because even within a brand some cereals will have it and some won’t.  Always check!**

———-

Frozen Desserts

Blue Bunny All Natural Vanilla ice cream

Breyer’s All Natural (Chocolate, Vanilla, and Strawberry flavors)

Belmont’s (Aldi’s) – any flavor

Simply Nature (Aldi’s) Popsicles

———-

other

Other

Nuts – any plain or salted nuts should be fine

Dried fruits (Generally safe, but keep an eye on the preservatives used.)

Hy-Vee brand Unsweetened Applesauce

Hy-Vee brand Marshmallows (Not sure about other generic brands, but the name brand Jet Puffed marshmallows have blue dye in them.)

Mozzarella Cheese Sticks (Hy-Vee brand, Kraft, and Happy Farms [Aldi’s] have all been fine)

Wholly Guacamole (We usually make our own guac, but this is nice when you don’t have time or if avocados are out of season/expensive.)

Salsa – most kinds are safe (This is my husband’s favorite snack.  Give him some chips and some Mad Butcher’s Salsa, and he is a happy man.)

Pretzels (Most plain, bagged pretzels should be safe.)

Popping Corn (not the bagged stuff, just the seeds that you pop on your stovetop at home)

Joy brand Waffle Bowls (fun for special desserts)

Yogurt (We make our own Greek Yogurt, but most brands will have some dye-free options.  I know Chobani, Dannon, and Yoplait do.  Yogurts branded towards kids probably will have artificial colors though.)

———-

Links to information on other bad food additives:

Center for Science in the Public Interest (CSPI) has a very helpful list describing all food additives.

Australia’s Northern Allergy Center also has a full list of food additives and any harmful effects.

A BusinessWeek article from 1996 shows that the dangers of food additives have been known or questioned for quite some time.

Hungry For Change has a succinct list of their top 10 food additives to avoid.

How Probiotics Fixed My Colicky Baby

I’m writing this for all the other mamas (and papas) out there with screaming babies.  The ones who are going crazy from sleep deprivation and frayed nerves.  The ones who stay up all night comforting a wailing baby to no avail.  The ones wander the grocery stores at night like zombies because they still hear the echoes of screams in their heads. The ones whose arms feel like they’re going to fall off and whose backs ache from sleeping in crazy positions with the baby, because it was the only way.  The ones who cry desperately with their crying child.

Maybe this is you right now.  Maybe this will be you in four months or in four years when you have a new child in your life.  This was me three years ago with our second son, Z.  I’m pretty convinced that those nine sleepless, stressful, cry-filled months permanently damaged my brain.  I’m not really even sure how, but it definitely feels like things don’t work quite as well as they used to upstairs.  The experience also left me with some PTSD (post traumatic stress disorder).  Whenever I’d hear him crying, even though the colicky phase was over, my heart would sink and race at the same time.  Initially, it was even hard to shake that feeling with our third child!  If you know the feeling, you have my deepest sympathy.

It’s a terrible thing to endure.  I used to joke that it would be an effective form of torture.  But seriously, I think it might be.  That’s why I’d like to share what finally fixed Z; to help end the torture of colic.  The answer was so simple: probiotics.  I still find it hard not to resent the doctors who told us it was a phase we had to wait out, and that Z was just a “difficult” baby.  I wish someone had suggested probiotics to us sooner, so I could have those lost months of my life back.  But what’s done is done. Hopefully what I learned through this experience can help other parents and their babies.

This is our story:

Z didn’t have classic colic; i.e., inconsolable crying 3 hours a day, 3 times a week, from when baby is 3 weeks to 3 months old.  He screamed and cried almost all day, every day….for NINE months.  He rarely slept for more than 40 minutes at a time.  This made him overtired, so he’d only be awake and semi-happy for about half an hour before he’d start crying again.  It was a viscous cycle. Nobody knew what to “label” his condition; I’m still not sure.  His pediatrician called it colic for lack of a better word. So we stuck with that.

At first we thought Z was just fussier than most babies.  After a couple weeks of very little sleep and lots of scream-crying, we thought he might be sick.  I had noticed some white stuff inside his mouth and wasn’t sure what it was.  I called the doctor’s office.  I described the problem to the nurse, who told me it was probably thrush (a type of yeast infection) and had the doctor send a prescription to our pharmacy.  We were desperate to help him feel better, so we gave him the medicine.  Looking back, giving a young baby such harsh drugs, especially without a proper diagnosis, was a colossal mistake.  I genuinely regret it.

Whenever you take antibiotics it kills all the bacteria in your system; it doesn’t distinguish between good and bad.  Our bodies need those good bacteria!  (Side note: Ladies, if you’ve ever taken antibiotics and then immediately gotten a yeast infection, this is why.  It messes with your natural balance.)  Eating yogurt with active cultures or taking probiotics replenishes the good bacteria your digestive tract needs to function properly.  There are a plethora of studies out there demonstrating the many, varied health benefits of probiotics: helping with diarrhea/Chron’s/IBS, improving digestive function, enhancing your immune system, etc.  We take them daily any time we feel sick.  The Harvard Medical School’s article on the health benefits of probiotics has more information, as does the probiotics page on National Institutes of Health (NIH) website.

Back to colic.  My guess is that Z had an underdeveloped intestinal tract.  Not uncommon in infants, particularly in those born earlier.  All of my boys came out naturally 3 weeks early; that’s just what my body does.  His early-ish birth may have predisposed him to some fussiness, but after he took the medicine for thrush (which destroyed any good bacteria he did have in his gut) Z’s fussy behavior quickly turned into completely inconsolable shrieking and wailing.  Giving him that medicine is probably one of my biggest regrets.

Months went by with Z only getting worse.  I did anything and everything I could to try to get him some sleep.  I remember one of the best ways to do that was to lay down with him, his head propped up on my shoulder and facing me.  He would scream and cry and thrash for anywhere from 15 minutes to an hour.  But if I held him close and shushed in his ear, he would eventually fall asleep (or I’d give up).  My arm would always fall asleep, and my shoulders to this day still haven’t fully recovered.

I did it because I’m a firm believer in the importance of sleep for good brain development.  My favorite book on kid sleep is Healthy Sleep Habits, Happy Child by Dr. Marc Weissbluth.  He has a section of the book devoted to colicky children and ways to help them.  There’s even a plan for sleep training those kids once the colicky phase ends when baby is about three to four months old.  Z didn’t fall into this camp.  We tried to train him thinking maybe the phase was ending, but it was torture for all of us.  He seemed like he was suffering.  So we gave up and just did what we needed to do to survive.

When Z was about nine months old, a doula friend of ours asked if we’d ever tried giving him probiotics.  (P.S. Doulas are amazing! I hope to be one when my kids are older and my time is more flexible.  Look into hiring a doula if you’re pregnant.)  We didn’t know much about probiotics, so we read a bunch of articles and research and couldn’t find any negatives.  We figured it might help and wouldn’t hurt, so why not?  Within a few DAYS of giving Z probiotics, he was like a new child.  He started taking naps and he wasn’t fussy all the time.  The endless hours of crying and screaming rapidly tapered off.  The next week we tried sleep training again.  He was sleeping 11-12 hours straight at night (no feedings!) and was napping for a total of five hours during the day.  It felt like a MIRACLE!  I can’t even begin to describe how incredible it felt to sleep for eight glorious, uninterrupted hours again.  It was life changing!

With our third son, L,  I wasn’t taking any chances.  I started giving him probiotics the day he was born.  I also ate a lot of Greek yogurt with active cultures, because I read that the probiotics in it could pass through breast milk to the baby.  Every little bit helps.  So far, L has been the healthiest baby we’ve ever produced.  🙂

pill

The most common question I’ve been asked about all this is how to administer the probiotics.  All you have to do is twist open one of the capsules to get at the probiotic powder.  Then carefully pour about 1/3 of it onto the baby’s tongue right before they nurse (save the rest for later). The milk will quickly wash it all down.  I’ve also heard of other women putting the powder directly on their nipples and then having baby nurse, or mixing the powder in with expressed milk and giving it to the baby in a bottle.  Whatever way you choose.  Just be sure to check the probiotics to see if they need to be refrigerated once they’ve been opened.  Some do and some don’t.

Also, it seems that recent research is suggesting probiotics are much less effective on formula-fed babies.  NPR’s article about probiotics being used to treat colic gives more details if you’re interested.  Something to keep in mind if you’re not breastfeeding or not planning to breastfeed.  For whatever reason, this treatment may not work for your child.

I encourage everyone to give their babies/children/selves probiotics.  While I don’t think it’s a cure-all, it’s certainly not going to hurt to try it.  It won’t even cost much; about $10-$15 per box, or as I like to say, less than a co-pay.  🙂  It’s well worth the potential health benefits in my opinion.  You can find probiotics in every grocery and big box store, they’re usually kept near the diarrhea and gas medicines.  If it’s hard to get to the store with your colicky baby (which I totally empathize with), you can buy probiotics on Amazon and have it sent to your front door.  I know you’re probably skeptical, just like we were, but please read the research for yourself and don’t be afraid to try it.  It might spare you a screaming baby.

Quick Dye-Free Egg Bake

I think the majority of recipes I’ll end up sharing with you require 15 minutes or less of actual hands-on work. With three kids, that’s how I roll. Mostly because I don’t have time to roll any other way.

This egg bake took me less than 10 minutes to put together. There are three basic elements: hash browns, eggs, and cheese. Everything else can be manipulated to your liking. You can season the hash browns spicy or salty, add diced vegetables or meats, and even add a crumble on top (I like using Grape Nuts cereal because they’re super healthy and give a satisfying crunch). You can do whatever you want/like/have time for/have in your fridge.
The version I’m posting is what I made for dinner last night. This dish is also great for breakfast, and it can be made the night before. Just refrigerate it overnight, then let it sit on the counter for about 40 minutes (so the dish can warm up) before you pop it in the oven. It’s also easy to double and feed a crowd. I’d say each batch would feed 6 adults (more if you have extra side dishes). This version happens to be vegetarian as well.

These are my big boys, J and Z, enjoying some bacon and a banana while they wait for me to dish out the egg bake. They decided to eat the main dish by mashing it up and putting ketchup all over it. Then they pretended to be zombies eating bloody brains. Yep. Never a dull moment… I’ll have to remember to make this for Halloween.
———————-
Quick Dye-Free Egg Bake
1 lb hash browns (any style cut)
6 eggs
1/2c milk
1/2c sour cream
1c (8oz) mozzarella cheese
1/2c frozen corn
1/3 c Grape Nuts cereal
Seasoning salt
Garlic powder
Onion powder
Italian seasoning
Salt
Pepper

1. Preheat convection oven to 375° (400° for standard oven).
2.Thaw hash browns in a glass bowl in the microwave for 4 minutes on 80% power.
3. Meanwhile, whisk eggs, milk, and sir cream together in a medium bowl. Season to taste with garlic powder, onion powder, Italian seasoning, salt, and pepper.
4. Grease a 2 quart baking dish.
5. Spread hash browns over bottom of baking dish. Sprinkle to taste with seasoning salt.
6. Throw down a layer of frozen corn, then pour your egg mixture over all of it.
7. Sprinkle with cheese and Grape Nuts.
8. Bake for about 30 minutes until golden brown on sides and bottom.

Note: The milk and sour cream can be replaced with 3/4 c of water. It will not be as rich or moist. It will turn out light and fluffy, and it’ll save you some calories. Just depends what you’re going for. You could also leave off the cheese if you need it to be dairy free.

Transitioning to Dye-Free Foods

So you’ve read Sorry, My Kids Can’t Have Food Dyes or other artificial color related articles.  You’re convinced that you should cut out, or at least cut back on, food dyes.  Now what?

I think the transition process looks different for everyone.  I’m very decisive.  Once a decision has been made, it’s as good as done.  I’m all in.  I cut out dyes in a day and never looked back.  Other people’s transitions are probably going to be a bit slower than mine.  That’s probably healthier from a psychological standpoint anyway.  I tend to be a little OCD; a blessing and a curse.  But onward and upward…  🙂

First, know what you’re trying to avoid when you look at the ingredients list on your food.  The following is a list of the terms you’re looking for and some common household foods that have them (for detailed research information on these please read Food Dyes: Rainbow of Risks).

  • Blue 1 – “brilliant blue”
  • Blue 2 – “indigotine”
  • Citrus Red 2 – only allowed for use to color orange peels
  • Green 3 – “fast green”
  • Orange B – only allowed for use in coloring hot dog and sausage casings
  • Red 3 – “erythrosine”
  • Red 40 – “allura red”
  • Yellow 5 – “tartrazine”
  • Yellow 6 – “sunset yellow”
  • Caramel Coloring
  • Annatto

Caramel coloring and annatto can sometimes be found on products claiming to be “all natural” or free of artificial colors.  They are derived from plants, so technically they are natural.  However, they have been linked to some pretty bad stuff like cancer and severe allergic reactions.

Two scary facts: 1) The FDA does not regulate these at all because they are “natural”, 2) Caramel coloring is the most commonly used food dye in the world (probably because it’s in things like cola, vanilla ice cream, and candy bars).  Consumer Reports has a really good report on the dangers of caramel coloring; it’s short and very enlightening.

As for annatto, it’s been shown to effect blood sugar levels, is not recommended while pregnant or breastfeeding, causes allergic reactions, and can cause the same behavioral problems as the artificial food dyes. Annatto is used to make things orange – I see it a lot in cheddar cheese, crackers, and fruit snacks. This one tricked us for a while, because it’s the only one on the labels that doesn’t look like a color name.  Watch out for it.

Sometimes labels won’t even tell you which colors are in the food.  They just say “colors added”.  Buyer beware.

cherry

Now that you know exactly what to look for, go through your fridge and cupboards.  You may be surprised about some of the places you’ll find colors.  Marshmallows, soy sauce, maraschino cherries, and pickles always stick out as some of the weirder ones to me.  You can do this all at once or as you have time.

Keep a running list of all the items you find with colors in them. These are the things you’ll want to replace with a dye-free alternative.  Sometimes it’s as easy as switching to a different brand or flavor of that item.  Occasionally there isn’t a great alternative in the store.  With these items you have four choices:  1) do nothing, 2) reduce your intake of that item, 3) live without it, or 4) learn how to make it from scratch yourself.

pickles

Take your list to the store.  Depending on how much time you have and how many items you are looking to replace, you may want to split your list up and make more than one trip.  It takes time to read labels, and you’ve usually got at least five different brands to look at with each product.  So be realistic and don’t stress out trying to find everything all at once.  I’m working on another post about our favorite dye-free store-bought foods.  Until then, here are a few brands that are generally safe and should be easy for everyone to find (but always double check the ingredient list): Target’s Simply Balanced line, Pillsbury’s Simply line, Aldi’s Clancy’s and Belmont lines, Kashi, Nature Valley, UNREAL Candy, and YummyEarth (I haven’t seen it in stores, but Amazon has it).

If you have any specific items you’re worried about finding an alternative for, please leave a comment.  I’d love to try to help!  Good luck as you begin your journey into dye-free living!  🙂